Friday, December 24, 2010

Christmas Decorations

Since 2000 I have been making a special handmade decoration to attach to the gifts of my very special family and friends. Over the years these have varied from cross stitch pillows to glittered letters, baubles and even the paper stars like my previous post.
This year I went with some origami balls called "Kusudama". What I didn't do though- was properly estimate the amount of time each one takes (almost 3 hours from beginning to end!). So far I have made 13 and still need to make another 4, and each one has 60 squares of folded paper (yep- do the math- that's over 1000 squares of paper!). I used an old copy of "Great Expectations" and am hoping that Charles Dickens wont object!!
If you are interested in having a go at making one you can find the instructions here (but take my word for it.... if you are going to make them Christmas.... START now!)
My presents this year are all wrapped in brown paper with string and the recycled book pages.

Sunday, December 19, 2010

Christmas Star Tutorial

I have had lots of facebook messages in the past 24 hours since I posted a pic of the paper star on the Echo Park facebook page, requesting a tutorial- so here it is!
For this star I used 1 sheet of Echo Park "Christmas Carol" from the Merry Christmas range.
Step 1- Cut the sheet into 4" (10cm) squares. You will get 9 from a sheet and we will use 8. Step 2- Fold the square in half to form a triangle

Step 3- Fold in half again.

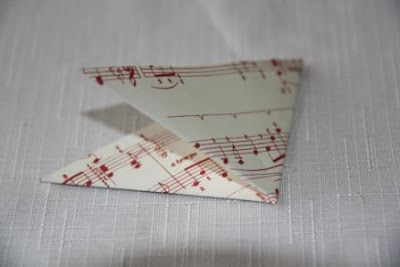
Step 4- Starting at the 2 open edges, cut a horizontal line approx 1/3 of the way up from the bottom of the page, stopping approx 1/4" (0.5cm) from the folded edge. Repeat the cut 1/3 down from the top point.

Step 5- Open the triangle back out to a square.

Step 6- Starting from the middle, roll the two points together (rolling it over something makes it easier!) and glue. You can use double sided tape, glue dots, hot glue gun.... whatever you like to use- but it does need to be a strong adhesive. (Give consideration to which side of your double sided paper you want to be the prominent side. I wanted the musical paper to be the most prominent so I rolled it first. If I wanted the stripes to be the most prominent I would have flipped the paper over.)

Step 7- Flip the page over and adhere the next 2 points together.

Step 8- Flip the paper back over and glue the last 2 points together. You should have 2 rolls going in one direction, and one roll going the other direction. Repeat for all 8 squares.

Step 9- Glue the 2 middle rolls together- in this case making sure that the pattern is going in the same direction, so one music roll adhering to one striped roll. Step 10- Glue the bottom 2 points together. Repeat to create 4 sets of 2.

Step 11- In the same way as step 10, glue 2 sets of 2 together in the middle, again making sure that the patterns are going in the right directions. You will now have 2 halves of the star.

Step 12- Now glue the 2 halves together, making sure the patterns are continuing around the whole star. Glue the middles first, and then glue the centre (overlapping the 2 halves' points)

Step 13- Make a hole at the top of one of the points and thread some stranded floss, string or ribbon through it to make a hanging loop.

And there you have a star!
You can experiment with different papers and sizes of squares which will give you a different finished star size.
If you make one of the stars please leave me a comment with a link to a photo of your star- I love to see how they turn out!

Saturday, December 18, 2010

Christmas Stars

Last night I ran some demo's making these stars at the Scraphaven Christmas break-up!
They are made from a single sheet of scrapbooking paper, and once again I have used the Echo Park Christmas paper (cant half tell I love this range?!!)

Friday, December 10, 2010

Christmas Gift Bags

45 minutes before I was due to leave for Black Forest Region Guide Leaders Christmas dinner tonight I decided that the plain white gift bags I was putting their gifts in was just not up to my standard! So I quickly decorated them! And here are the 5 quick steps in takes for you to make them at home!

Red Cardstock- cut to size of bag and border punch the edges.

Echo Park paper- cut to size and ink edges.

Add white thickers for name

Cut out ornaments from Echo Park paper, doddle on them and stick them on- mounting one with foam tape! Voila! 8 Gift Bags decorated in less that 45 minutes!

Scraphaven Class- 10th December

It's been a long time between posts- and a long time between scrap layouts! I've been busy making my annual christmas decorations (which I will share with you if I ever find the time to get them all finished!! )
Tonight I am teaching at Scraphaven in Sunbury- and am hoping the lovely ladies will enjoy creating this layout using the Echo Park christmas range! For the ladies who are booked, bring along a black fineline marker and your photo. (I used a 5x7 landscape, but we can easily adapt the page to suit whatever size and orientation you bring!).

Saturday, November 27, 2010

Scraphaven Class Thank You

A huge thank you to the lovely ladies at Scraphaven who took part in my class last night! I was sooooo nervous teaching my first "live" adult class- but they were all very gentle with me and their layouts all turned out great! And no one complained about the fussy cutting! Phew! Here is what the class was based on. I used the My Minds Eye Alphabet soup papers and participants had the choice between using the boy papers or the girl papers. I am repeating the class again next week- 3rd December (10.30am or 7.00pm) , for those that missed out, and the Christmas class using Echo Park will be on Friday 10th (10.30am or 7.00pm)

Monday, November 22, 2010

Red Earth Scrapping

I was delighted to be asked by Helen to be this month's Red Earth Scrapping Random Challenger!
I have set everyone the challenge to create a layout that uses patterned paper as the base and use scallops on the layout.
Here is my sample using the very pretty Fancy Pants "Wishful thinking" range, which I purchased from RES, using the voucher I won from the October monthly challenges!

Tuesday, November 16, 2010

Kraft it Up- November entry

This month at Kraft it Up the challenge was to use Kraft (of course!) and decorative edges.
I went a little mad with my border punches and created this LO!

Friday, November 12, 2010

Handmade by Suzanne- November sketch

This is a page I completed today for the Handmade by Suzanne November sketch.
I used some new Bella Blvd papers that I recently purchased from Suzanne (although the colours haven't photographed so well today!)

Sneak Peaks of my upcoming classes

I am very excited to have been asked to teach some classes at Scraphaven in Sunbury. If you live locally and would like to join my first class which is happening next Friday- 19th November, let me know and I'll send you the phone number to call to book in! The class features 2 LO's using the My Minds Eye Alphabet Soup range. My samples use the boy range, but we have in stock the girl range which will work perfectly as well!
I also have another class coming up (date to be advised) for a Christmas Layout using Echo Park Christmas papers!

Wednesday, November 10, 2010

I'm having scrapping withdrawls!!!!!

I havent scrapped a LO in weeks! Aggghhhh!! Hoping to get something done this weekend!
Have managed a couple of cards though!
These 2 were made for Tom and Meg's teachers for World Teacher Day. I learnt how to make these cards at a class at Scraphaven taught by Dianne Moon (and I'm teaching my first class at Scrap Haven next Friday night!! Book now! LOL!).
And this card was made for a beautiful couple who got married last weekend!

Monday, October 25, 2010

Stuck?! Sketch... October #2

This is my entry for the October 15th Stuck Sketches challenge.
This month Red Earth Scrapping is one of the sponsors and set an extra challenge for RES members to use lots of pink! I think I got that covered!
Once again, a mountain of fussy cutting from me. Can you tell that I find fussy cutting very therapeutic?!!!

ARTastic challenge

This months ARTastic challenge used the painting 'A Summer Morning' by Rupert Bunny as the inspiration, and you also needed to use shades of pink, a pink rose and a white bird. As soon as I saw the painting I remembered these really old photos of Meg feeding the pelicans and knew I had to scrap them!

Red Earth Scrapping- October Entries

Here is another entry for Red Earth Scrapping- this one is for Red's Random Challenge. You had to use a photo of yourself and a date as your title!

Sunday, October 17, 2010

Scraphaven Retreat

Just got home from a wonderful weekend at the Scraphaven retreat in Bacchus Marsh.
I completed 11 Layouts (most of which I have posted on here!)
Here is the LO I created in the class taught by Donna Longhan.
Cant wait for next year's retreat (October 14-16th.... book now!)

Kaisercraft "Mix it Up" October challenge

For the October Kaisercraft challenge you had to use stripes, 2 photos, a frame and a flower. I stamped the frame with several of the kaisercraft background stamps in different colours. Certainly not my usual colours but I love the LO!

Handmade by Suzanne October sketch

I am so in love with Echo Park papers (and my beautiful niece who I sctapped using the Echo Park papers)!!! This is my entry for the Handmade by Suzanne sketch challenge.

Forever Always- October Sketch

Had a play with the Forever Always October sketch. I love these 2 photos of Tom and am happy with the match of the papers and photos!

Red Earth Scrapping- October Entries

Here are 2 entries for the October weekly challenges at red Earth Scrapping.
The first one required you to create a L/O which replicates patchwork quilting and includes at least 3 different pink elements in your creation & some form of sewing. I'm really happy how this turned out!
The 2nd challenge was to use the quote that is on my LO, as well as fabric, ribbon and pink!
Love this too (and love the girls in the photo!!)