Tuesday, October 29, 2013

"A beautiful life" tutorial


Greetings everyone!
Today I have a new tutorial for you over at the Scrapbook Boutique blog!


Love this selfie photo of our family, taken the afternoon I got home from my 4 week stay in hospital!  Can you tell we are happy to be back together?!!!


For this layout I have used the Echo Park "A beautiful life" collection, 
All the instructions for this tutorial are over at the Scrapbook Boutique blog and you can get all the supplies you need from the Scrapbook Boutique store!


Blessings,
Narelle xxxxx


Tuesday, October 22, 2013

"Soak up the Sun" Tutorial


 Hi everyone
Today I have another tutorial for you over at the  Scrapbook Boutique Blog!


For this layout I used the Simple Stories "I heart summer" range which is available from the Scrapbook Boutique online store.


Blessings,
Narelle xxxx

Products Used:-

Monday, October 14, 2013

Sharing my latest creation for the Molossi Design Team.......


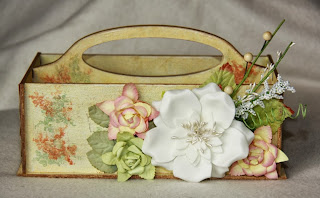
This month I altered a Dusty Attic Tool Caddy.  I'm going to use it to store all my adhesives as its the perfect size for my Helmar glue bottles etc, but as I was altering it I kept thinking of ideas for Christmas presents.... doing it up for a teen girl filled with hair styling products and tools, a desk caddy for a special teacher, a caddy for beside the phone to store pens and paper etc.... so many uses!


I assembled the caddy, using some Helmar tacky craft glue to ensure it all stayed together.  It comes flat packed and this is how it looked when I had assembled it and before I got messy with the paints and inks!


then painted it with several coats of paints.   I randomly swiped brown ink over it and wiped it back off to give it an aged look, and ran the brown ink around all the edges and handles.  I used a floral stamp with rust and green ink to add some colour.  I covered the two ends with floral paper, using x-press it double sided tape then dry brushed paint over the top to tone it in with the rest of the caddy and added some brown ink to the edges.


Once everything was dry I decorated the front using gorgeous Manor house flowers- Wishes "Peace"  and Wild Rose Mix which I adhered using Helmar 450 glue and Helmar Liquid Scrap Dots.  I also added some Dusty Attic Dusty Rose leaves.


Molossi Products Used:-
Dusty Attic Tool Caddy
Manor house flowers- Wishes "Peace"
Manor house flowers-  Wild Rose Mix
Dusty Attic Dusty Rose leaves
Helmar tacky craft glue
X-press it double sided tape
Helmar 450 glue
Helmar Liquid Scrap Dots

Other Products Used:-
Sullivans Paints
Versamark Ink
Kaisercraft Paper


Pop on over to the Molossi blog to see what the rest of the DT have been creating lately!

Blessings.
Narelle xxxx

Thursday, October 10, 2013

Scrapbook Boutique monthly challenge and blog hop


It's a new month  and time for a new challenge and blog hop at Scrapbook Boutique!

Your first chance to win is by having a go at our monthly inspiration challenge!  Complete a  project that's  inspired by these gorgeous cupcakes-  either something using the colour scheme of purple orange and black or a Halloween project!   You can create a Card, Scrapbooking layout.... whatever takes your fancy!


 Entry is open to all Australian residents, and you need to upload your creation to the Scrapbook Boutique blog. The challenge closes at midnight on Halloween..... October 31st!  The winner will receive a $30.00 Gift Voucher to spend in the Scrapbook Boutique store!


For your Second Chance to win.....  be part of our Blog Hop, and you could win this gorgeous Flourishes Stamp set "A Year  In Flowers #1."


You have  come to my blog from the blog of the very talented  Melissa.   Your next stop is Sue's  blog!  Leave a comment on each DT members blog, and the Scrapbook Boutique blog too! The hop will be open for 1 week, closing midday  17th October, the winner will be announced on the SB blog on 18th October.

Thursday, October 3, 2013

Molossi..... in the Bird House!


This month I played with the Dusty Attic chipboard birdhouse kits for my Molossi Design Team project!

For the first one I inked the pieces with brown ink, concentrating the ink on the outer edges. I covered the roof with a single piece of woodgrain paper and used a fence and bird sticker to decorate around the bottom of the house, and added some ManorHouse roses.
 

For the purple house I assembled the house first then painted it mauve, followed with a coat of lilac paint.  Whilst the paint was still wet I heated it with a heat gun (getting up quiteclose) so that the paint bubbled and gave a weathered appearance).  I die-cut scalloped shapes from woodgrain paper to create the tiled roof, before adding molossi rainbow sticky bling and Manorhouse flowers.


For the final house I wanted to create a Christmas feel (imagine how cute these would look hanging on a Christmas tree?!).  For this one I covered each of the pieces in patterened paper, cut them out with a craft knife and then glued the piece together using Helmar tacky craft glue before adding theManorhouse"Extravagent' bling trim, Molossi Silver bling and  Manorhouse flowers." 

Pop on over to the Molossi blog to see what the rest of the DT have been creating lately!